DIY Shabby Shimmer Glazed Frame


This would be my 3rd glazing project... ever.

But also my third glazing project in 2 months time.

I think I might be hooked.

I happened to come across the perfect picture for above my cabinet (click the link to check the cabinet out... It's my first glazing project and I am so IN LOVE with it. I have so enjoyed the ease of crafting, scrap-booking, sewing, and preschooling that this thing provides me.)

The picture had the right colors. It evoked feelings of peace and sanctuary (this is very important in my home ha!). It was marked 50% off of $40.00 (this is also very important. My budget is SMALL). Only problem: at 16x20 above a massive cabinet, it wasn't quite big enough. My solution: a wide, chunky frame.

Can I afford to pay for custom framing? That would be a big, fat NEGATIVE.

So...

I hit the thrift stores once again and found this for $4. (Swoop!)

The frame came with a sweet hummingbird picture... that I knocked out of there. Sorry Hummingbird. I liked that the frame was thick, it was made of wood, and, most importantly, it was made for a 16x20 picture.

I knew I wanted to to something subtle but still wonderful to the frame. So, I thought I would play around with glazing again. This time I wanted to try out a shimmer effect... mostly because, well,  I am a girl, and I like all things that shimmer and shine. What can I say?

I started out by masking off my frame. Blue tape is great for projects where you need a clean paintline. Do use your fingernail to seal the tape to the frame so there is no bleeding.
I mixed burnt umber (a deep brown) with a little black just to darken it. A little black goes a long way so do add a little at a time. I used a spongebrush to put on the base coat because it is faster than a bristled brush.

For my second coat, I mixed Folk Art's Champagne Metallic Paint with Deep Base. Deep Base is what paint stores use to make dark colors as it has no color of it's own to lighten the colorant. It looks milky when wet but dries clear (if you aren't using Behr brand do double check at your paint store that your brand's deep base dries clear... I imagine that they all do, but I am not positive). Because Deep Base dries clear, it can be added to paint to make it more translucent. This will allow some of the base-coat color to come through. I did a 1:1 ratio for paint to deep base and then added water till I was able to hold my stir stick up and paint come off in a steady flow (not runny, but not clumpy... smooth flow).
I used a small angled brush to apply the glaze. (Glaze is just a fancy term for paint that has been made more translucent).
As I applied the glaze, I took my chip brush and brushed it against the wet paint to remove some of the glaze and give it a "brushed" look. For a small project, like this frame, extender is not needed, but if you were glazing a large surface you would need extender. Extender is a product that you can purchase at a paint supply store to keep your paint from drying as fast so you have time to apply the glaze (like in this case, brushing it on and then brushing some of it off).
By the way, free-bie kitchen tip: these bad boys make excellent basting or pastry brushes . I discovered this in my mother-in-law's kitchen (she is an AMAZING cook). I opened one of her drawers and found a couple chip brushes lying in there; I was disturbed thinking that my husband and father-in-law had placed their used  paintbrushes in her kitchen. Nope, only ever used for very strict and official kitchen business. (By the way: they are around $1... way cheaper than the brushes labeled "basting" or "pastry" brush in the kitchen area of your department store).

For my 3rd coat, I used my angled brush to apply black paint that I had thinned with water into the grooves of the frame. As I applied the black paint I went back over it with my chip brush. I made some long, sweeping brush strokes on the frame in random places with my chip brush. I did this with very little black paint on the brush.
Notice the way the brush is angled in the picture above. I did this to get black streaks almost like scuff marks.
For the fourth coat, I used the brown-black I had made up earlier. I thinned it a little with water. I put a light amount on my chip brush and made big sweeping brush strokes all over the frame (I followed the direction of the wood grain). I applied a lot more of this than I did the black. I wanted places where my frame was brown, places where there was just a little bit of shine coming through, and places where the shine hadn't been covered at all. It gave it a "shabby" chic look.

For still more interest, I added a fifth coat: just a tiny amount of the blue glaze I used on my cabinet. I applied it the same way as the 4th coat... only lighter. This was a great idea. The frame by no means looks blue. You'd have to look up close and very carefully to see the blue streaks, but, sitting above my cabinet, the frame seems to pick up on the colors of the cabinet and the cabinet picks up on the frame. They look like they were meant for each other.

By the way, the paint must be dry to the touch before adding another coat. If your project is small like this one and you don't care to take any breaks from your work, keep a blow dryer handy.

I decided to further freshen up the frame by painting the matte and gold trim. I made a 1/2 white and 1/2 antique white color. (I think I may be a bit color picky... but the white was too bright and the antique white was too dark...) I also made up my own "gold" color. I hated the orange-y gold on the existing frame, but the champagne shimmer I had was too light. So, once again I mixed my own gold color. I used champagne, antique gold, yellow and like a drop of black to dull it (all by Folk Art).

I know I am picky but check out the difference in gold colors:
Who likes the top one? I do! I do! (Okay, just make me feel better and agree with me. Ha! I actually like the original gold color, but it didn't match the brass pieces I have on the cabinet.)

I had to take my angle brush and go back over some spaces on the matte where the gold paint bled through. Did I stress the importance of running your fingernail over the edge of the tape?! Learn from my mistakes!

To finish up my project, I installed the picture hanging hardware. (Just picked this up at Lowe's)


This was seriously my favorite part. I totally enjoyed playing with paint colors and glazes... but not as much as I like playing with a drill! Power Tools! :) (I am not ashamed to admit that upon marriage, I had no clue how to get the drill bit into the drill. I kept looking for a button. Ha!) 

The finished project:


Cost:
$20- Picture
$4- Frame
$4- Champagne Metallic and Umber Acryllic paint
$5- Chip brush and small angle brush
$2-Picture Hanging Hardware
Already had other paint colors, deep base, and foam brush

Total: $35  

That's less than a 16x20 matte picture at regular price... without the frame! Yes! I win!

I love the way it turned out. It is subtly wonderful. And since it resides above an obviously wonderful cabinet (if you read about the cabinet project, you know I earned the right to refer to it in such a boastful manner haha), it's wonderfulness really should be subtle. It doesn't take away from the cabinet or the picture. I think it adds to it. Once again: I Win!

Side note: It's kind of fun to say: "I Win!" Try it.

I hope I inspired you to try your hand at glazing... though I warn you, it is slightly addictive ;)
xo


I am linked up at:

DIY Cabinet of Awesome

As a warning, I have this love/hate relationship with Pinterest. I love being inspired. I love having a place to store my ideas.

But...

I hate when I research how to do something, invest money to make it happen, spend hours of work on it, have to improvise because nothing is ever as simple as one picture makes it look, and then someone says, "Oh, you got that from Pinterest" as though I saw one picture, clicked it, and it magically appeared. No I did not get it from Pinterest. I got it from blood, sweat, and tears. And not that I think I am so wonderfully intelligent and unique that no one else can think up the same idea on their own or that I am spontaneously inspired without any originating ideas, but lots of my ideas formed in my own mind. My projects belong to inspiration, research, creativity and hard work. Pinterest can share ideas, Pinterest can inspire, but please don't give it all the credit. Okay, rant over. Apparently I felt the need to be raw and human and a little prideful. Please, tell me I am not the only one that feels this way.

So, you have been warned, don't look at this DIY and comment with a "Wow, you got this from Pinterest." I may just "rawr" at you. Ha!


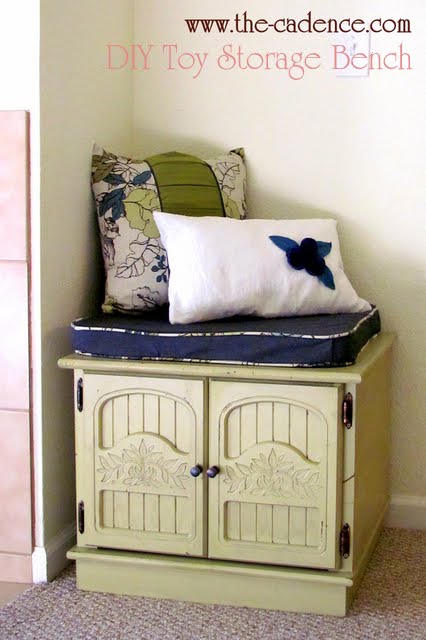
That said, the idea for this project started from need. I needed somewhere to store my scrapbooking stuff, I had it spilling out from under my bed. I needed somewhere to put all my sewing and crafting stuff. What started out as 2 neat drawers in a plastic storage unit in the corner of my room, taking up a mere 2ish square feet, became piles of fabric, ribbon, craft stuff stuffed into paper bags and the now-crammed drawers and spilling out into my room... multiplying square footage of messiness exponentially. Michael, now in a schooling program full-time, needed to use our front closet for his uniforms... the closet where I placed all of Addy's games and preschool stuff. The place where I had hung our preschool cork boards was not my brightest moment.  It has push pins, and it is well within reach of a toddler's grasp. (I found this out at a preschool meet up at my house when 3 of my friends had toddlers and immediately 3 sets of chubby little baby hands were drawn to the cork boards and their push pins... a small nightmare. Sorry friends! But thanks for making me all the wiser.)

It needed to be large enough to house all of my stuff. Pretty enough to be located in my dining area. Functional enough to somehow hide preschool learning time and easily pull it back out. Also, it needed to be inexpensive. Could one piece of furniture really meet all these needs?!

Need made me begin to search the internet and, yes, Pinterest, in search of solutions.

Armed with an arsenal of ideas, I hit the thrift stores in search of the perfect cabinet unit.

I found this piece. (Sorry, I once again forgot to take a good "before" picture. I remembered after I had taken it apart.) I wasn't drawn to this piece because I thought it was pretty. I was drawn to it because it met my need of function. I knew I could add the pretty later.

It's a mission-style, dresser cabinet. It has a couple pieces of pressed wood, but the bulk of it is solid wood. It is well-made, though well-worn. Drawers and doors were sturdy built. My favorite part: the cabinet doors closing mechanism is a magnet grip that makes it hard to open... my kids are not going to be able to open this thing for a few years!

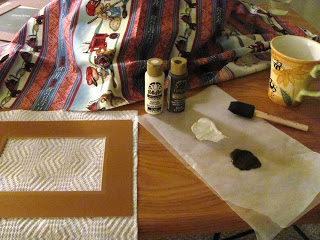
I started this project by cleaning the cabinet with a mild degreaser. I took out the drawer pulls. Since I knew I wanted knobs, I filled in the drawers that had 2 holes with wood filler.


I patch up the major dings with wood filler. I let the wood filler dry over night and then sanded it till it was smooth with wood surface. I scuffed up the cabinet with a sanding pad, but later found out the primer I purchased was good enough to not need to sand first (Look for Zinzer 1 2 3 Primer if you want to not have to sand too).


I primed the cabinet. It took two coats.


I enrolled my father-in-law to help me with the glazing. I wanted it to be a blue color that picked up the light and dark blue in my curtain fabric. It took more samples than I think I could count to get it right. The paint I picked out was the wrong color. I had in my head that my curtains had turquoise in them. Definitely not. It was a dulled blue. I think my dad spent 4 days and 4 hours each day trying to get the color right for me. Thank you Dad for being so patient with me!

I applied the glaze using a positive application (meaning I added some glaze and then used my brush to hit against the paint to move the glaze over the piece. I went back and lightly brushed it so there was subtle brush strokes in one direction. This took a little practice and some extender so the glaze didn't start to dry before I was done with a surface). I messed up the entire cabinet once because I didn't thin my glaze enough. It ended up clumpy looking and way darker than I wanted. I messed up my cabinet doors and had to repaint them when the glaze dried before I was done applying it to door and I ended up with lots of patches of heavy and light glazing. I definitely got to that point where I felt like, "I am just SO over this."

I made a very translucent glaze out of my green/gold paint that I used on this project. I applied it where I thought the sun might have faded the cabinet.

It was so worth it to try out glazing. I love the depth this cabinet has. This cabinet is not just a color like it would have been had I just picked one paint color I liked and slapped it on. It ended up being a work of art marked with my own signature brush strokes. The lighter color comes through. The darker color is subtle. The very faint patches of green/gold are barely visible but add the appearance of a sun-aged piece of furniture. The brush strokes are suggestive of wood grain.

Glazing was frustrating, but it was also fun. I felt like a painter and the cabinet was my canvas. I got to be creative and even daring without having to be a talented artist that can actually paint murals or even just a 8 by 10 canvas. I am so not that person. But glazing kind of let me be. I enjoyed that.

Glazing will require some research and some practice. (Check youtube for how to videos on making your own glaze, glazing application techniques and antiquing furniture... I didn't do this but my dad did and he said he found good information that reminded him how to do it... it had been a couple years for him.) It may even require that you re-prime and start over. But seriously, it is so doable. And I think... worth it.


Thank you SO much DAD! You were such a help! He helped me mask it off (one of the hardest parts of painting something is just prepping it to be painted... especially if you are painting it in your home.) He helped me make the new holes for the hardware. He spent a lot of hours fixing my bad paint color choice. Best of all, he gave me the gift of learning how to glaze. He did the first mix. After that I felt comfortable enough to make the green/gold and the antiquing glaze for my bench project. He made it accessible and let me try my own hand at it. Thank you Dad! I know you could have done this and it would have been seriously beautiful and intricately worked by a master technician, but you let me do it. And now I can take pride in my own handiwork and have a new skill under my belt. Time together and skill learned...priceless gift. 

I picked up some beautiful knobs from World Market. They have a great selection of quirky, antique, and unique knobs. I decided to do 2 different ones, mostly because I couldn't decide which one I like better, but also because it added to the aged-effect and uniqueness of the piece.


I think dressing up the cabinet was my favorite part. I got to shop!


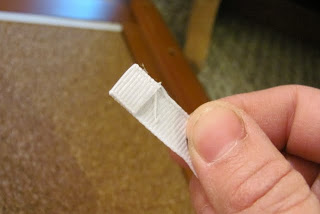
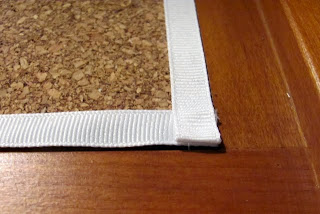
I made one side of the cabinet my preschool side. I hot-glued corkboard squares down the middle of the door. I added ribbon detail to make it look more finished and to divide my board into sections.


It was as simple as cutting and folding ribbon over to keep edges from fraying and hot-glueing it on.


I made the other side of the cabinet my scrap-booking side. By the way I haven't finished putting all my stuff in. I promise it will fill up the entire of this cabinet. Ha! I made this side my chalkboard side for Addy to practice writing her letters, but mostly just for fun. Chalk is awesome... Why? Because it doesn't mark walls or stain clothes, and it is easy on mom and Addy. Having the chalkboard housed in a cabinet door keeps the potential chalk dust mess from being available for Addy to make whenever she wants. There is a "lip" on the cabinet door that catches most of the dust to keep it from getting everywhere. Major Win!

By the way...I went to purchase chalkboard paint from Lowes and it was $15 bucks and only came in quart size. So, I checked Walmart and found it in the acryllic paints section in a small bottle for $5. It would be cheaper to cover a large surface with Lowe's paint, but with such a small section, Walmart wins!

Can you tell I love my cabinet? Ha!


I love it. LOVE it!


My new peaceful view (well, when the house is clean anyways, ha!) from my kitchen sink.


Cost:
$109- cabinet
$45- Paint: 1 qt of Zinzer 1 2 3 Primer in base color, 1 qt of Behr Eggshell in a dulled dark blue color, 1 qt of Behr Eggshell deep base (for glazing)
$15-drawer knobs @2.99 a piece
$10-door knobs @4.99 a piece
$5-chalkboard paint
$1-chalk
Free-Wood filler, Roller, Brushes, extender, masking paper and tape were all on hand from my father-in-law. Cork board and ribbon I already owned (but cork board squares were super cheap at Walmart when I originally bought them... like $3 for 4 pack??). I counted the cost of the green/gold paint I used in glaze in cost of bench I made.
$185-Total

I don't think I could even buy something similar for twice as much if I wanted to. I saved a ton of money doing it myself. Perhaps, the style is a taste all my own, but this girl LOVES the way it turned out. I can't express the pride I have (you know, the good kind) from the hard work and creativity put into this thing. The function of it is AWESOME. I have been able to do preschool time so easy. If Addy is bored, I open up the chalkboard side and let her imagination go for at least a good 15 minutes. My sewing, scrap-booking, and craft stuff is conveniently located right next to the table I do all that stuff on, making set up and clean up much faster. I LOVE it!

Sorry if I appear to brag (and to be honest I so am bragging), but I suppose after 5 weeks of a tore up house and hard work, one should be allowed to gush a little. Thanks for letting me.

Bragging rights earned!

I hope I inspired you to go earn yours!

And promise I won't say "Oh, you got that from Pinterest." Ha!
xo


I am linked up at 

DIY Repurposed Toy Storage Bench

Anyone ever feel as though their entire life has been reduced to cleaning up toys? Some days it feels as though that's all I do.  In an attempt to make life and toy clean-up duty a little easier, I decided to organize my home and start with the living/dining area first because that's where most of the living happens in our little piece of the world.

Honest moment: Having a designated place to put things is great, but I find just having a space that I like to be in motivates me to keep it clean and tidy. Decorating is Organization Motivation... ha!


I set out to find a piece of furniture that could serve as toy storage and a bench. I could use an extra seat in my house when I have company.

I have a VERY limited budget so I hit the thrift stores (with a bestie and without both kids... a winning combination for a productive and fun day). I found a piece of end table ugliness that was the right size for storage and the right height for sitting on. It was a mere $20

I forgot to take a good "before" picture. BUT I found a picture of my cute kiddos with the table in the background before I fixed it up.

Ugly end table is in the upper right corner of the picture. You like? Ha!
I really didn't need to sand it. I did scuff it up a little with a sanding pad. I used Zinzer 1 2 3 primer available at Home Depot. A good primer keeps there from being a need to sand. If you hate sanding, ask around for a good primer to use that will stick to any surface.

I painted the cabinet the color of one of the leaves in my curtain fabric.

My curtain fabric was the inspiration for the whole room. Not quite sure why but I love this print. It has such an organic, easy feel to it. It feels modern, but it's a little bit quirky. I love the colors in it too. I think it might be me in a curtain!

After painting the cabinet, I thought I'd try scuffing it up a bit to antique it. I wasn't too crazy with the way it was turning out, so I stopped. I didn't hate it enough to go back and paint over it though. (Can you tell I got tired of projects and just wanted it to be done?!)

I made a really translucent black/brown glaze that I put over the cabinet to make it looked aged. I used a negative application, meaning I put in on and then wiped it off. I had fun with it... letting it stay heavier in the cracks and on places I thought would be more worn. Glazing was easy and a lot of fun. (However, I seriously feel under-qualified to explain it well. I don't think I could do the entire process justice. Plus, a lot of it is just based on preferences. Don't let it scare you though! Anyone can do it with a couple youtube/blog tutorials under their belt...or as in my case a very well-informed, ex-faux finisher and cabinet glazer for a father-in-law. It essentially involves making a more "clear" paint so that the underneath will still come through.)

I also replaced the hardware.


It is really deep so it fits a lot of toys. Also, my daughter loves to pull out all the toys and use it for a fort/hide-and-seek space.


I made some pillows to make the bench look inviting. I happened to have all of this fabric on hand from past projects. The white pillow was made from an old shirt and scrap fabric. You can see more about it here. For the pillow behind it, I made my own pleating down the middle for some texture, added homemade piping on either side, and then used my curtain fabric for the rest.

 
For the cushion I purchased a piece of high-density foam. I measured it onto some left over denim fabric I had. 


My mom gave me her left over upholstery cording from a project she did a while back and I made the casing for it out of my curtain fabric. If you want to add a professional touch to a pillow or a cushion, upholstery cording is a really easy way to do this.

Cut cording the length of all your sides and add a couple inches just to be safe. (If you do it like my cushion you will need 2 sets... one for around the top and one for around the bottom.)


Cut a 1 1/2 inch strip of desired fabric. It will need to be as long as cording. (Doesn't have to be one continuous strip of fabric. It is really easy to add length.)

No need for pins for this. (SWEET!) Get out your zipper foot, fold fabric over casing (right side out), and position so your needle hits as close to cording as possible.

The trick to a tight casing is to feed the cased cording at an angle so that the cording touches the tip of the zipper foot and remains as snug against the entire foot as possible... this is achieved by feeding it at at angle. (My mom showed me this... and it changed my life. Okay maybe not my life, but it sure was helpful! Thanks Mommy!)

 To add length, simply fold over end of another strip of another piece of fabric.

Place it over where the fabric leaves off on cording and keep right on going.


Making all that upholstery cording was SUPER easy!
Add it by placing it around the perimeter of your fabric. It can just be sewed as you are sewing the top and bottom of your cushion to the sides (sorry I forgot to take pictures of the rest of the project.) Remember to feed it at an angle so that your seam ends up tight against cording, lest you have floppy cording. Also, I pinned everything together on the foam itself so I knew it would fit nice and snug. Making the cording was easy, but I fear adding it is not. It's not really complicated, it just requires some sewing muscles. I broke 3 needles and managed to sew my finger (ouch!). It is just a bit difficult to sew through a couple layers of fabric and get the cording to cooperate around the corners. Anyone with moderate sewing abilities can do this; it just takes a little determination and muscle.

Now that the bench, cushion and its pillows are done... I say that cording was totally worth it! It looks legit. I can't imagine it looking "finished" if I had used the denim by itself.


Anyone else feel like plopping down on that bench, knees pulled up, coffee in hand, and contemplating life? The bench looks so cozy next to the fireplace!


I am considering adding velcro to the cushion and bench so the cushion stays put but decided to live with it for a while to see if it's even necessary. I forgot to mention I just added a zipper to one side so the cushion case can be washed.


Cabinet: $20
Hardware: $7
Paint: $15 (I am adding my primer cost and glaze cost to large cabinet project cost, because that was what I originally bought the stuff for, leftovers were used for bench)
Foam for cushion: $16
Zippers for cushion and pillow: $4
Everything else I had on hand: Score!
Total: $62

Not bad for a cabinet that houses my kids toys, provides an extra seat in my living room, and adds style and warmth to my home.

Hope I inspired you to go conquer your house projects. You can do it!
xo

DIY Chic Shirt Pillow

I am not this amazing sewer. I enjoy it *sometimes.

But I like creating. I like looking at my home and saying "I made that." I like saving money. It makes me feel like the invaluable Proverbs 31 woman when the work of my own two hands adds to our home.

I wanted some pillows to warm up my space and tie everything together... but mostly just to "cute-ify" it. Pillows aren't all that practical, at least not when your couch all ready has a cushioned back, but oh, the cute girly-ness they can bring to a room. I NEED some pillows.

I got the idea for this pillow here. I saw her pillow made from an unworn shirt and thought, "That looks easy. I could so do that."

It was SO easy. And I SO did it. (In an hour... that includes the time it took to make the liner and the flowers)


I used to be a 5th/6th grade teacher at a school that required teachers to wear uniforms as well as the students, so I have an abundance of white button down shirts I will most likely never wear again. This particular shirt is white, extra-long, and subtly polka-dotted... a perfect combination to making a busty girl appear larger than she is.

Fat-shirt... it is time to destroy you! Mwah-ha-ha! 


This pillow was originally a red microfiber pillow from when I first got married and I was digging the reds and browns. My shirt fabric was too thin to hide the red so I found some white scrap fabric from some curtains and lampshade project I covered my pillow with it. I just sewed three sides together on the wrong side and then turned it right side out, stuffed my pillow in and sewed the pillow shut on the remaining side.


The last seam didn't turn out perfect... But will anyone notice it on my pillow when it done? No. So do I care? No.
I made my cuts on my shirt (mind you... only 2 cuts! Whoo-hoo for easy!)

I sewed the sides together (mind you...only 2 sides! Yep, this was REALLY EASY!)

The best part about using a button down shirt... The company who sewed the buttons and button holes on my shirt also made them for my pillow. I DIDN'T HAVE TO! Whoo-hoo! I can now take off the pillow cover to easily launder it. This is important when your pillow is white and your children are young (okay forget my kids, I make messes wherever I go!).


I added some flower embellishments. I just used some scrap felt cut into 1/2 inch strips and made them into jelly-roll type flowers and used a combination of thread and hot glue to keep them together. I free hand cut the leaves and then doubled-up my thread and stitched the vein down the middle. I used a combination of hot glue and hand-tacking to get it all to stay on the pillow case.


I love the pop of purple in my room with blues, greens and browns. I love the shabby chic-ness of the raised white polka dots. This pillow is cute, super easy, and makes me smile.


Alright, so there you have it. Super Easy DIY Pillow case. Cost: NOTHING. I had everything on hand.

So dig out your scraps, your out-dated pillows, and crucify some fat shirts!

All in the name of a warm and welcoming home, of course ;)
xo

A little fabric, a little spray paint, and a whole lot of hot glue... makes an old lamp brand new

Last week my daughter decided that she needed to pull on the slightly loose piece of fabric on the lamp shade. The results:

And besides an old lamp made uglier, it also resulted in the motivation I needed to finally redo this lamp. I have had it since I got married (6 years ago!) and Granma passed on some of her old furniture to help furnish our first place.

This project was pretty easy. I happened to have some leftover fabric from a curtain project a while back. Bonus! I can have a lamp that matches my curtain. Am I put together or what?! (And to those who know me well and know that I always have at least one item on my person that does not match, you are welcome to insert your chuckle here).


What I needed:
Old Lamp
Spray Paint
Scrap fabric (I had a like major yardage of an 18" strip... but a yard of 54"-60" would do the trick on a shade like mine.)
Bias Tape
Hot Glue Gun

I spray painted the base. I had thought about making it a nice black. But I quickly nixed that notion... I am a little crazy, so I made it blue. This made me very happy, and I do have little pops of blue throughout the room this lamp is residing in. So it worked and its surprising. I think it's a good idea to have little surprises in your home (and no I am not talking about about your toddler's sippy cup under the arm chair that has a strange smell coming from it or your pair of lacy panties that got lodged between the cushions when you were folding laundry). Not too many surprises, that's overwhelming for the eye; just a few, so the eye has some places to go that make it smile.

Smile Eye. The Lamp is now Blue!

 While I waited for the paint to dry I decided it was the perfect opportunity to clean and sanitize the race car activity station for Jed. Brilliant idea for whilst I finished this project, he was kept occupied (for a little while anyways).
Awe! Gushy Mommy Moment! That smile is warming my heart :)

I took apart the lampshade. I decided to save the lining on the inside in case I wanted to put it back on when I was done.
I put a piece of fabric up against a section of lamp and rubbed a pen along the frame to get my patten. I put seven pieces of fabric together (I only needed 6, but I wanted an extra one in case of mistakes) and cut them out. I made sure the fabric grain ran down the middle.
I worked one section at a time. I hot glued the fabric directly onto the frame of the lamp. It seemed to work best to start on one of the vertical sides (going up the lamp), then do the bottom, then the top, and then the other vertical side. Pulling it very tight was very necessary to keep from there being any weird pulls in the fabric. It took just a little muscle but this wasn't too hard.
I trimmed all the extra fabric.
 I opened a thin piece of doubled bias tape and placed it along the vertical framework of the lamp.
I put the lining back on. It didn't "need" it. I just think the shade looks a little more "legit" with it and it keeps my white on white flowers from standing out too much (I do have to share my home with my masculine husband, ha!) Then I took a wider piece of single bias tape and glued it to the top and bottom.
I thought I would love the lamp with some spring green ribbon trimming the top and bottom, so I added that too, but, alas, I decided it made the floral shade look like it belonged in a girl's bedroom on a hot pink base. But, nevertheless, I bet ribbon could look good on someone else's lamp shade project...
I pulled the green off. I love that about hot glue. It has a strong hold, but not so strong my ill-choiced ribbon had to stay put.

I like the way it turned out. (Btw in the picture on the right it looks like the lampshade is misshapen in one section...it's not. It's the way all the sections are because the fabric is pulled tight.)  For the picture on the left, I used no flash so you could see the subtle-ness of the floral print. I am thinking I like the white on white pattern for a lamp shade. It's a little girly, it picks up the fabric from the curtains, but it doesn't overwhelm the room with "Girl." (Husband appreciates this.)

This project cost me less than $10 because I had almost everything on hand. So next time you are feeling like you need a new lamp--thrift, garage sale, or search your own home for a lamp with a decent shaped base and a shade that has a metal frame. And let the Creating Commence!

I am thinking about distressing the base. I do love shabby chic. What do you think???

Here is the lamp sanded after the first coat of spray paint to give you an idea of what it would look like distressed. I just can't decide! Help! (I used the flash so you could see the contrast... it's not actually that blue)

Also thinking about adding a different colored ribbon to trim the top and bottom of the shade. My white walls make me want more color, but maybe the blue is enough? Maybe a nice beige ribbon? Ah...Decisions...

Thankfully it looks really good in the room as is, so I have plenty of time to process a decision. :)

Because not everything is perfect in a crafting world, my notes from the project:
  • I should have paid attention to what could be seen with the lamp shade on. I sprayed what I thought would be visible and ended up having some brass exposed at the top. It's kind of bugging me, not quite enough to fix it yet though.
  • I sanded the first coat a little to get the next coat to "stick" good, but forgot to wipe down the lamp, so now I have a slightly rough finish where the pieces of paint are underneath. Also, brass isn't the best thing to sand. Sometimes, Amanda... Oh well, it's kind of fun driving my former-professional-painter-of high-end-finishes husband a little crazy.
  • This used A LOT of hot glue. Like 8-10 sticks. Have lots of hot glue on hand before you embark on a hot-glued lampshade adventure.
  • The metal frame of the lampshade was cool to the touch, so it quickly cooled the hot glue. I had to pull off set glue a couple times because I wasn't fast enough.
  • I used a decorator's 100 percent cotton fabric. It's a little more durable than just plain quilter's or dress-maker's cotton. It pulled tight just fine, but I worry that a low quality cotton or different kinds of  finer fabrics may not look good taut or withstand the pulling well. (Also thinking the fabric needs to be one that can withstand the heat of the hot glue without melting???)
  • This took me 10 minutes spread out over 3 hours to spray paint (3 coats) and 3 hours spread out over 2 days to complete the lampshade. So if you have 2 small children and craft on your dining room table, plan on it taking a while. If you have a glorious project room, an empty nest, and dedicated and sacred crafting time, it'll probably take you significantly less time.

Simple Kitchen/Dining Room Space Saver Ideas

I've only lived on my own for 6 years, but I feel like a small space expert. I suppose 2 years of only being able to call a bedroom and walk-in-closet your own as a family of 3 followed by 9 months in a 400 sq. ft. studio apartment will do that to a person.

My small spaces forced some creativity.

My most used kitchen tools in easy reach in a pretty vase.

My husband bought me flowers that came in the same vase two years in a row for my birthday. Of course, I noticed; but I did not care, because, honey, if you want to get me flowers I do not care if they come in the same vase every time. I rejoice in the thought!

On a side note, the second time I got this vase, I was teaching 5th/6th grade. My husband ordered a gerber daisy flower arrangement because this girl loves the friendliness and colorfulness of the gerber daisy (I think of Meg Ryan saying in You've Got Mail "Daisies are the friendliest flower" while stuffing kleenex into her robe). So the flower delivery guy comes into my classroom and delivers my flowers. I thank him and read my note. I am one happy girl, my students are "oooh-ing" and "aw-ing" and then 2 minutes later the flower delivery guy comes back in with another arrangement, this time a single rose arrangement. My very smart husband ordered the arrangement I love, then ordered the cheapest arrangement and had them make 2 deliveries. I was surprised and felt so loved! So, if for some odd reason a man reads this blog, take note: it takes a phone call to a flower shop and $39.95 to make a woman happy and an extra $14.95 to make that happy woman uncontainably overjoyous and thinking to herself what a find she has in her husband... not to mention thinking how she can thank him back... just saying. By the way, I never cared cared that it was the cheapest arrangement; most women won't.


While my sister was helping figure out how to configure my tiny studio apartment, we stumbled across the vases while unpacking and decided to use them to put my kitchen utensils in. Pretty and Functional. Sums up this idea and sums up the way I like my living spaces.


My cute little kitchen in the studio apartment we lived in. Love how the pops of color on the vases in my relatively monochromatic space make the kitchen fun and bright.

Pretty and Functional. Yup that's pretty much it. And the vases proved to be so pretty and so functional, I decided to keep them when I got a kitchen that actually had the drawer space to contain my spatulas.


The "Dining Room" in our studio apartment.

A Couple More Space Saving Freebies:

1. Place Dishes on shelves: Saves you cupboard space and keeps a small kitchen feeling open.

2. Large Cutting boards can easily turn a sink into an extra work surface. Ikea has a large one for only $10 if I remember correctly. (Pretty much, if you are going to be living in a small space, a trip to Ikea is very justifiable). This is also great if you have surprise company and dirty dishes in the sink. Plop that cutting board down over your sink, light a candle on top, and just like that your mess disappeared.

3. Think soothing and clean monocromatic color scheme with pops of color. Loved my subtle spa blue color in my apartment. I blew up some of my own pictures in black and white prints and placed them in matted frames for some personalized wall art. (Frames came from Ikea for really cheap and pictures were turned into black and white prints for really cheap at Walmart). Also, adding a couple of items in black help ground a space. (Notice what those black chairs do in the dining room picture... a couple of black items point out the ethereal-ness of the room. They actually help the room seem bigger.).

4. Kitchen Island. We refinished an old microwave table hidden in my parents garage and turned it into our island. It was perfect: storage underneath, work surface on top. We sanded the top and left it in it's wood finish (We just oiled it. You can purchase butcher block oil or just use some olive oil.) and spray painted the rest white.

5. A tall dining table that can double as a work space/island. Pull the chairs away and its an island, clear it off and add the chairs and its your dining room table.

6. The 21" oven/stove. We found ours off on craigslist for $50. Sure big meals were a little complicated (even though it has 4 burners, 4 large skillets will not fit at the same time); but it was the happy middle ground between no stove or a stove that prevented us from opening our refrigerator door.

7. Stacking Appliances. Microwaves have a great flat surface on top of them and since we had little counter space and the microwave and coffee pot were 2 appliances that we could not hide away in cupboards, we stacked them.

8. Never underestimate the power of a positive attitude! I called our small space our New York City Studio Apartment Adventure. Grant it, I could not be farther from New York City, but that attitude kept me reminded of the fact that I am not the only one hacking it out in a small space and that this really could be an adventure. No matter how thankful I was when we could leave, I absolutely cherish the time spent in that space. It was an adventure!

Small Space Nursery

Not sure what it is about my babies and closets, but my daughter and now my son have had their nurseries in my closet. I guess it started because at 5 months pregnant with my daughter, we got the news that the company my husband ran with his father was done, and, because of some bad tax advice, not only did he not have a job, we owed in back taxes. We had no choice but to move in with my parents. It was definitely a hard season of our life, but one that we learned a lot and grew stronger as a couple.

I guess there is just a stubborness (probably if you asked my husband, he wouldn't guess, he would know) inside of me. I determined that in spite of circumstances I WAS NOT going to lay down and allow life's circumstances to rob me of what I thought were necessary things: a nursery and decorating for a baby. Now on my second child, I can tell you it was the hormones talking. These are not necessary, but they sure make a woman feel better. I smile to think that one day my kids may grow up and laugh about being placed in the closet, but I have the proof in pictures that I made the most of it. You can't deny this momma's love or her desire to give her children the very best. I hope I teach them how to LIVE (not just survive) through the trials of life.

The closet was a perfect space for an infant: close enough to mom and dad to hear baby's cries, close enough to be very convenient to answer those cries, just far enough away to not be kept awake by baby's breathing, most come with doors if you need a sense of privacy, and everything you need for changing, swaddling, diapering, etc. is in arm's distance. I am now a closet-nursery advocate!

Adelaide's Nursery
I liked the nursery in my closet so much I decided to do it again. I won't say I LOVE it. I would LOVE a closet all to myself (a girl should be allowed this small piece of selfishness). If I had a third bedroom, my baby would have been put there. But when faced with the choice of placing my baby in his sister's small room on the other side of our place or in our large closet. I chose the closet. So, no, I will not take offense if you opt for a "normal" nursery, BUT, if you are faced with small space issues or trying times, the closet is a great option... an option I LIKE.
The Changing Station with my custom wall art from past project and changing pad cover from a project I have yet to blog.
Jedidiah's Nursery. It's a little less "decorated" than his sister's, but this one has to function as our closet, his closet, changing station and sleeping space. A lot of function for a 4 1/2x11 closet!
 Small Space Nursery Suggestions:
  • Think Function. Use the Rods in the closet for your baby's clothes (or your clothes). Use the shelves for storage (though I recommend not placing anything on shelves above where your child sleeps... at least not anything that could potentially fall and hurt your baby).
  • Hanging Shelves. Brilliant canvas shelves that hang on closet rod. It's where I keep all my cloth diapering supplies. I got mine at Babies R Us but I have seen them in the closet organization sections of Walmart and Target.
  • The Mini-Crib. They are the same size of a portable crib (the length of a twin bed headboard and a little over half that in width). It should last your child until they are 18-24 mos. (and if your child is anything like my daughter you will have to switch to a toddler bed at some point during this time anyways simply because she keeps climbing out of the crib.) Only downside to a mini-crib, there are next to no cute bedding options (I didn't have a hard time finding plain fitted sheets and bumper pads, but there is not much variety in the way of sets). The mini-crib can be really cheap or even come made to last and grow with your child like some full-sized cribs do.
  • Lingerie Dresser. Because these bad boys are skinny and tall, they take up very little space and are just the right size for tiny baby clothes. We redid a funky one from the 70's. We replaced the drawer fronts by making new ones out of MDF board, painted it, and put on some new drawer knobs that my mom and I hand-painted to go with the farm theme. (Because these dressers are so tall they need to be strapped to wall when your baby starts to cruise to prevent it from falling over on your child. We just screwed a scrap piece of 2x4 to the wall and then screwed the dresser into that.)
  • Dresser with changing table on top. I thank the Lord for this everyday. I made the lack of a dedicated changing table work with my daughter (we just kept a travel changing pad handy near her crib and used that until we had to lower the bed, then we used the floor and changing pad). But if you have the extra bit of space for a dresser that is a large enough to put a permanent changing pad on top and diapers nearby... DO IT!
  • Keep wall colors light. You want a nursery not a dungeon or cave. A closet easily can feel like that if you go overboard on the paint colors and wall decor.
  • Curtains. Ikea sells a track curtain system that can be placed on the ceiling if the closet isn't an option and you want a dedicated space for baby. We spent 9 months in a 400sq ft studio apartment with our toddler and it's how we made it work. I told Adelaide it was her princess bed... she loved it. (By the way, I found inexpensive fabric that worked great at blocking light, and then dressed it up by buying an extra sheet from her bedding set and adding it to curtains as an accent. I think it cost me $40-$50 with the fabric, the sheet, and the track system)  I think it's important to find a way to dedicate a space for the baby, mostly just so that mom and dad have a space that is their own.
Addy's Princess Space in our tiny studio apartment. I wish this picture showed the track system... but I am sure you can check it out on Ikea's website or at your local Ikea store.


 I think the point behind all of this, is to make the most with what you got. Don't fret, momma, because circumstances and space limitations don't match your ideals for your baby. You want your child to have the very best, but I promise you the "very best" you can give your child is your love. Chances are, if you are looking on the internet for how to make your small space special for your baby, you already have that going on.


Best Wishes to You and Your Family! 

Oh! And I would love to see pictures of your "small space" nursery!

Nursery Wall Art on a Budget

We rent our apartment, therefore we cannot paint or wallpaper our apartment. But when a women is nesting, Lord knows, she wants to DECORATE! I want a cute nursery, but don't have much money or much liberty living in a rental. My simple solution was to add some wall art. I went down to my local thrift store and found some framed photographs from the 1980's (and they looked like it too!). But the frames worked and the mattes were good. I found 3 matching frames for $8.00.                 

The frames taken apart and already spray painted. If the lovely clerk from the thrift store happens to come across this... I apologize for destroying the art work. (The clerk was horrified that I would throw out the picture and reuse the frames... but what are you gonna do?!)

...As a brief aside, my church just opened its thrift store, City Thrift in Lodi, CA. All profits from store go to feeding those in need as well as into our women and children home and young men home in the process of being built. I say this to say that if you are in the area, consider taking your donations and doing your shopping at City Thrift, and, if not, consider supporting a local non-profit thrift store that gives back to your community. And, as an added bonus, they are often cheaper.

Okay, so back to the project...

I found a cute farmer boy fabric at Walmart to go with my farm-themed nursery. The print was just the right size for my frames (something to keep in mind should you choose to put fabric in your frames.) Another option I considered was using the wallpaper border from the nursery set I fell in love with. You might not be able to put wallpaper on the walls in your apartment, but who says you can't put it in a picture frame?!

Finding frames and finding what I wanted to put in them was the biggest part of the battle. Once you do that you are ready to tackle the project!

Supplies:
  • frames with mattes
  • fabric, wallpaper, or picture
  • spray paint for frames
  • acrylic paint for mattes (I recommend against using "Apple Barrel" brand for this project. While cheap, they seem more "watery" to me. Not best when painting paper product like a matte. I find Folk Art or Delta brands work best)
  • small sponge brush
  • Disposable pallette paper (or for the "non-painters" like me, wax paper does the trick)
  • Cup with water
  • Work surface and something to paint on... i.e. keep your table paint free. (I used paper towels, but paper towels are capable of bleeding, so if you are super worried... try wax paper.)
  • double sided tape or photo splits
  • scissors
Got my supplies together. Notice the the sun-fading on the matte. Super old, but it totally still worked!
Step 1: Take apart frames and spray paint the frame.


Step 2: Paint your matte(s). You will not want to get too much water on your sponge as these are paper product. It should "warp" just a bit. But as the paint dries, the matte will go back to its original flatness.

Be sure to paint the same direction... could just be my own "particularness" but I think it looks better, not to mention pro.
Notice how my brush strokes all run in the same direction, even around the corner.
Allow the paint to dry completely. It really depends on how many coats you put on, but this should only take a couple hours.
My very sophicated and high-tech acryllic paint drying station.

Step 3: Cut out fabric and attach to matte (the bottom matte if using two or more). To attach, I used photo splits (double sided tape works the same) and placed them on the back side of the matte close to the inner corners. Four did the trick for the smaller frames and six worked for the larger frame. Lay your fabric section on a flat surface and press your matte sticky side down onto the fabric exactly as you want it to appear in your frame.
Step 4: Put the pictures back together in their frames (minus the old picture, of course).

All done!

My favorite picture. Love that I am having a baby boy!

Total Cost:
  • Frames: $8
  • 1/2 yd. of fabric: $1.50
  • 2 acryllic paint colors: $3
  • Paint sponge brush: $1
  • Spray Paint: $3
I had everything else on hand. So my grand total was: $16.50 for 3 double-matted frames. Pretty sure buying some baby wall art would have cost me at least $40 at the cheapest of stores and I managed to get some color into my baby's room for less than a gallon of paint. Sa-WEET!